Roughbeak
Member
Hello everyone! I thought I would share some details of the process involving texturing, including how to activate Parallax Occlusion Mapping. I apologize if it is too lengthy to read, but for beginners in CryENGINE, it might be a helpful aid. If you have any specific questions about texturing, please ask me, I will do my best to help.
Firstly, to produce terrain textures, is to create two subfolders in your GameSDK folder, “Materials” and “Textures”. “Materials” folder is where you should store your Material Editor files (.mtl). Whereas the “Textures” folder, stores your actual library of your texture maps (Diffuse, Specular etc.), and you should have separate folders for your different textures.
Also, name your subfolders the same name your texture files are, to avoid confusion. Even though some people have different ideas of organizing, this is at least mine. I tried many other ways other than this, but it either crashed or a “Resource Compiler” error.
Next, find an image that you are convinced that will fit inside your scene/level, and download it from the internet. I use CG Textures, there are others, including: maxTextures, TextureX etc.
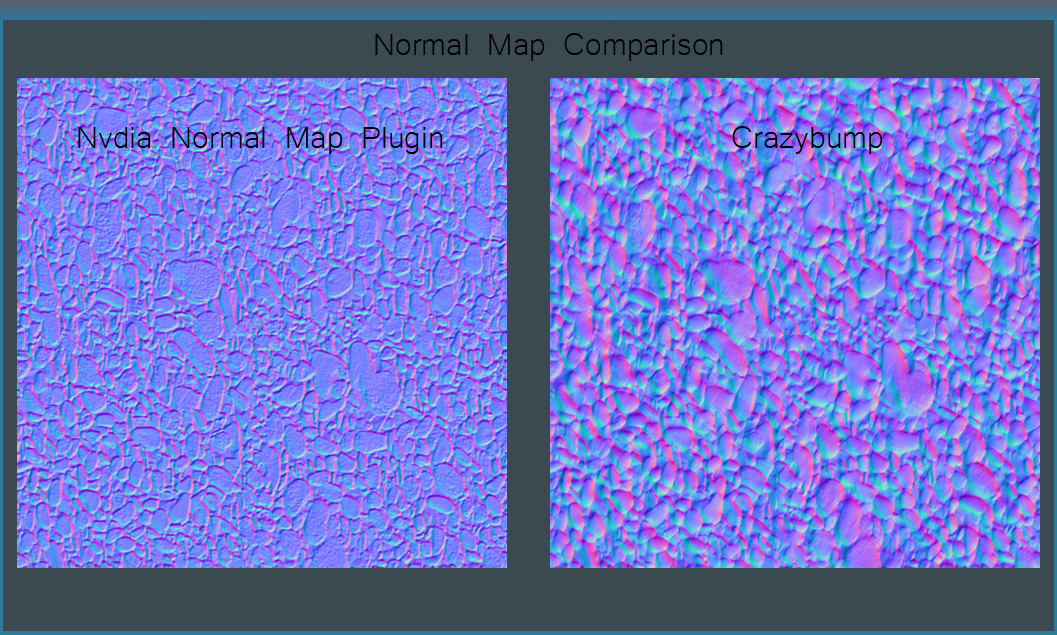
The joy in texturing terrain is that there is no huge magic behind this, just Photoshop + Crytif Plugin and Crazybump, some people have different techniques. However, developers from CryTek use the same approach. Differences between Nvdia and Cb are below:
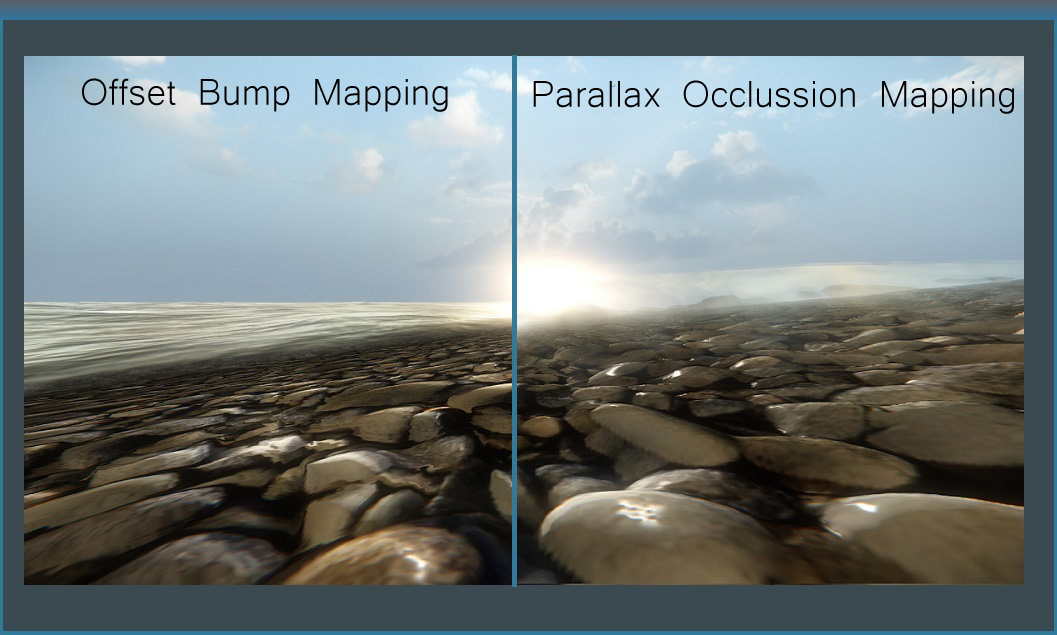
Also the Offset Bump Mapping vs Parallax Occlusion Mapping (OBM shows up in low settings and POM appears in higher settings:
My routine is creating Diffuse, Specular, Unified Detail, Gloss maps etc., in Photoshop. Then I use Crazybump for Normal and Displacement maps. You need the CrytifPlugin for Photoshop from Crydev to make these operable in the Engine. If you cannot get your textures working right, it is probably because you do not have Photoshop and the Crytif Plugin from Cry Dev. Also the “Material Editor” in the CryENGINE SDK is to organize your textures, and fine tuning.
The creation of Diffuse, Specular, Normal, Displacement, perhaps Gloss and Unified Detail maps take endurance and experimentation to get right (especially when I have 110+ stash of textures). Many of my textures are 512x512s, but I am beefing up my arsenal quickly with 1024x1024 and 2048x2048s.
You have to make sure you textures are seamless! Open your Diffuse in Photoshop, offset the texture with “Filter\Other\Offset…”, and make sure it “wraps around”. After that, use the “Close Stamp Tool” (hotkey: S), this takes time and much practice, but it is worth it. Just remove those seams by cloning and stamping.
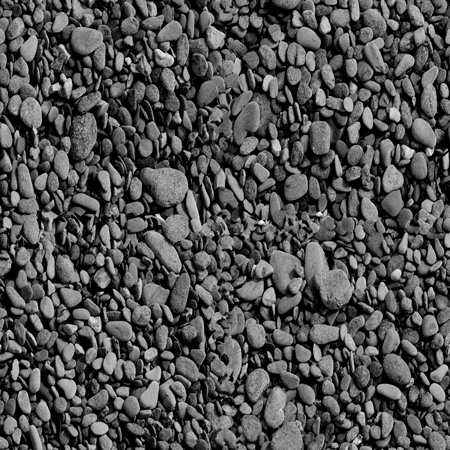
Here is the original image from CG Textures below, which I will display all along this blog. Fortunately for you, I converted it to seamless, you can download the original JPEG Diffuse (1024x1024) right below.
http://u.cubeupload.com/Roughbeak/1diffuse.jpg
Each texture has its own different settings and tweaks, and I will try my best to explain them to you.
Diffuse (_diff)
The most common type of texture, and it defines the main color. It is totally flat, like a photograph being painted on the surface.
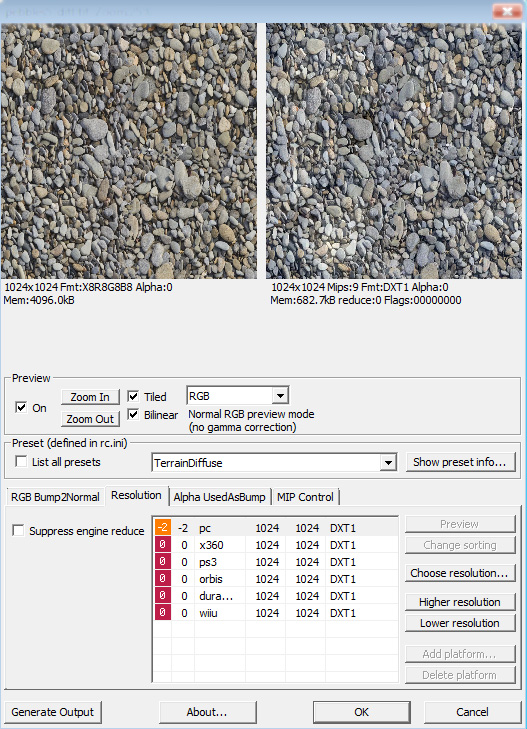
First, open up your texture you downloaded in Photoshop. Depends on what resolution you want your texture in or what the image was originally, never stretch the image more than what it was originally. Always set your texture to the power of 2 (e.g. 512x512, 1024x1024, and 2048x204), it is good practice to start with the common 512x512, because it is relatively small in size and memory. Now save it as “CryTifPlugin” with an end suffix to your name of the file to “_diff”, and in the Resource Compiler (RC) Dialog save it with a preset either as a Diffuse (either “HighQ” or “LowQ”") or “TerrainDiffuse” (I have had much more success with the latter). The “_diff” is to notify the Resource Compiler that the texture is a Diffuse. Also tick the “bilinear” option, which is a method to smooth textures when displayed larger or smaller than they are. Next, choose your higher or lower resolution inside the RC (which makes the texture clearer than it actually is). Lastly, save it.
or “TerrainDiffuse” (I have had much more success with the latter). The “_diff” is to notify the Resource Compiler that the texture is a Diffuse. Also tick the “bilinear” option, which is a method to smooth textures when displayed larger or smaller than they are. Next, choose your higher or lower resolution inside the RC (which makes the texture clearer than it actually is). Lastly, save it.

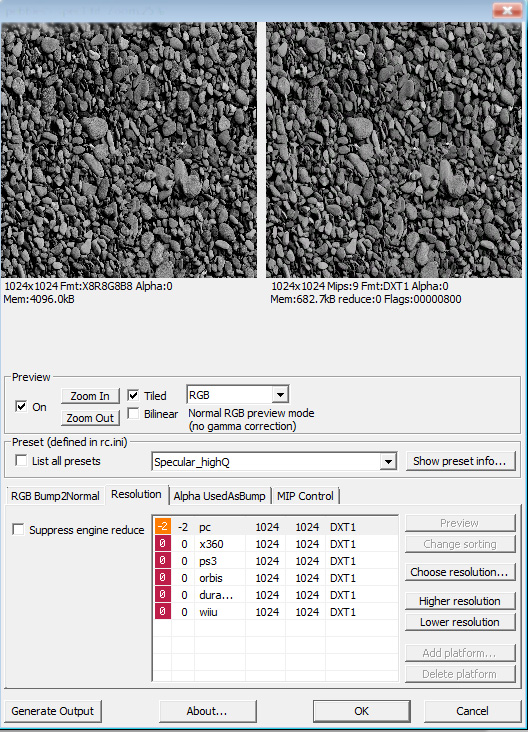
Specular (_spec)
Purely black and white image that represents the intensity of the “shininess” or “light shine” on the surface.
To produce this texture map, you need to use your same “diffuse” as the basis and click “adjustments\black and white” in Photoshop. Next, you need to go to “adjustments” tab again, and click on “levels”. If your texture is a rock surface (including cobble), I would recommend a “62”. For other materials, like grass or gravel, perhaps, a little less. However, you can play around with these to your liking, higher levels determine how the shininess will it appear and so on. Go ahead by saving this as a “CryTifPlugin”, now with a “_spec” end suffix and click save. The RC will arrive once again and select “SpecularHighQ” (or LowQ), then lastly choose your resolution (inside the RC).
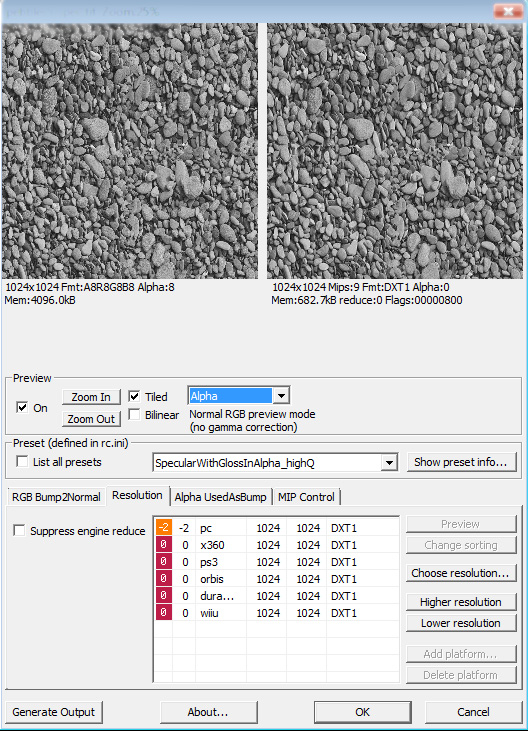
Gloss
This is only if needed, but is basically the Specular’s cousin. It is an Alpha Channel specific inside the Specular map. The difference between this and Specular, is that “Gloss” controls the spread or width of the specular intensity. The more white it has, it will be smoother or glossier (wet) in the Engine. Whereas if you have a darker Gloss map, it will be more rough or spread out.
To create this, you need to start out with your original Diffuse, de-saturate it in Photoshop, adjust some values with “adjustments”, and throw on some dodge/burn if needed. The reason I am keeping this vague, is that there is no “one way” of achieving this, you just have to imagine what your material is, dry, wet etc. Again, keep in mind that you are controlling the highlight spread, not the intensity. When you are ready, select all of the image (Ctrl + A), and paste (Ctrl + V) into the Specular’s Alpha Channel. Save your Specular map, again, with the “CryTifPlugin”, and an end suffix “_spec”. When the Resource Compiler appears, select “Alpha” instead of RGB, and the preset as “SpecularWithGlossInAlpha_HighQ”. Lastly, choose your resolution. In the Material Editor, make sure you tick the “Gloss map in Specular alpha”.
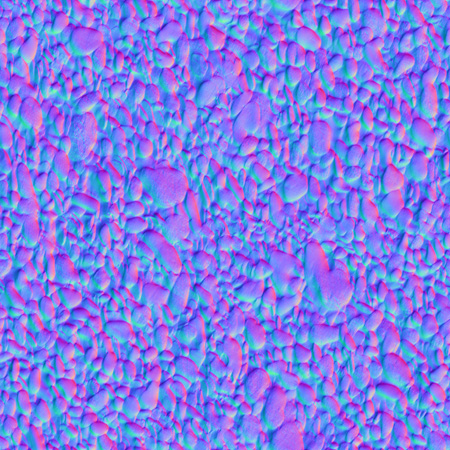
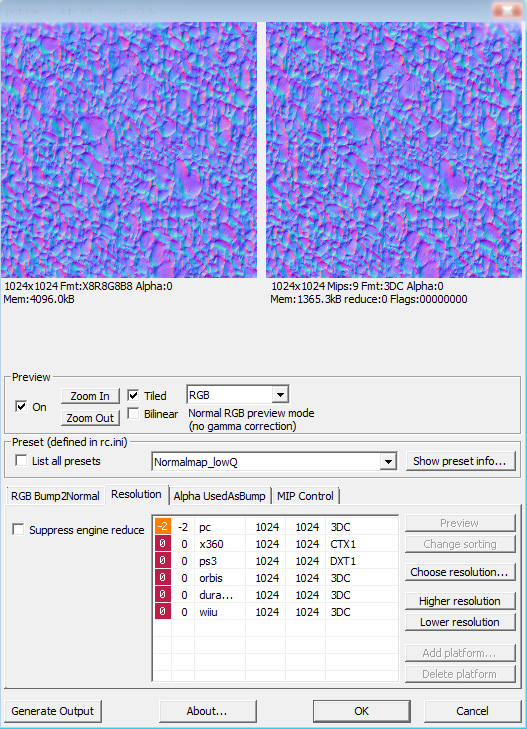
Normal Map (_ddn)
The next two texture maps (Normal and Displacement) is what makes texturing quite an enjoyment. The Normal map, is the successor to the famous “Bump Map”. They have small differences between them, but among many CryENGINE artists, they use these two words interchangeably. This specific texture map appears to add depth to your material, and it produces details to the surface (usually shadows) without raising the number of polygons.
To generate this colorful map, we need to have the Nvdia Normal Map Plugin for Photoshop (making sure it is correctly installed) or the nice program named Crazybump (I suggest the latter). Using your default Diffuse as the base, we begin. I recommend using the default settings when you click on your “Normals” tab in the software. I tried without the default settings, but they turned out horrible in the Engine. Save it within Crazybump, and open your newly saved Normal with Photoshop. Go ahead and save it with an end suffix “_ddn” and as a “CrytifPlugin”. Again, the RC will show up, and save it as a “Normalmap_lowQ”. Saving it as a “Normalmap_HighQ” will cause problems, however. Then lastly, choose your resolution within the RC.
Displacement Map (_displ)
The Displacement map works in a similar fashion to “height maps”, but uses smaller functions. As the name describes, this map “displaces” the underlying surface mesh. Also, this activates things in the CryENGINE SDK’s “Material Editor” such as Parallax Occlusion Mapping and Offset Bump Mapping. This texture map is generally not used on its own, but instead used for larger details, and Bump or Normal Maps then can handle the smaller shadow details.
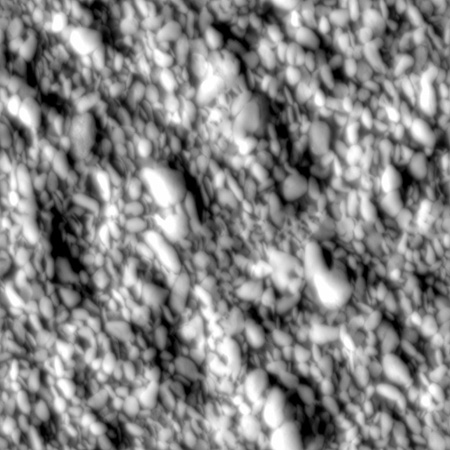
To create the Displacement map, we have two different routes, either with hand painting it in Photoshop (time consuming) or in Crazybump. However, some artists like hand painting to give great detail to rock textures, but I found out it is impossible to achieve this with a grass or perhaps a gravel texture. It was a great day when I found Crazybump, this neat software does this for you. We begin by opening Crazybump, select your same Diffuse and wait for it to load. By using my “pebble5” as an example:
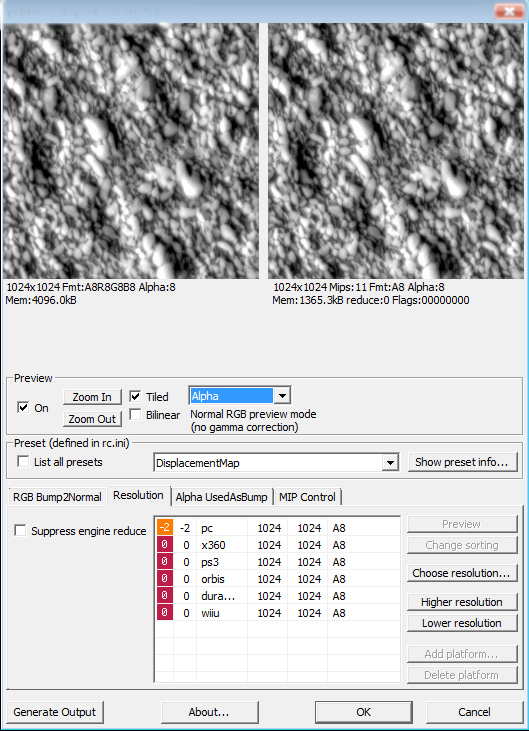
I moved the Depth to “60” and Enhance Detail to “10”. That should be good enough, go ahead and save it as a “JPEG” in your CryENGINE texture library within Crazybump. Now go to that same folder you store them, and open up your JPEG with Photoshop. Being as a “Displacement” it is a bit different from the rest of the texture maps, so we go ahead by clicking “ctrl+a” (which selects all of the image), and place it in its Alpha channel. Save it as a “CrytifPlugin”, with a “_displ” end suffix. When the Resource Compiler shows up, instead of the “RGB” option, select “Alpha” instead. Save it with a preset as “DisplacementMap”, and lastly choose your resolution. After that, it would be a good idea to delete that original JPEG image that you stored in the library.
Unified Detail (_detail)
Also this is used when necessary (usually with rock surface), this texture map gives the texture macro detail over the surface at moderately low cost, memory and performance wise. However, this texture map is a bit complicated than it appears. Being a unified method, it has to be constructed similar to this:

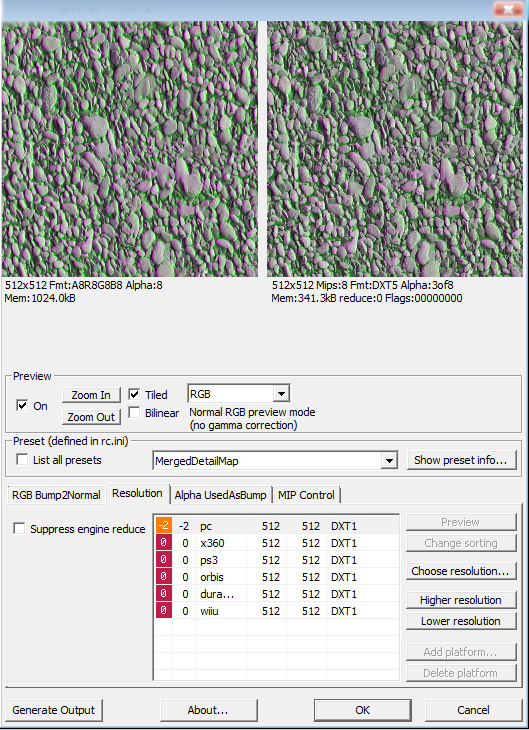
Starting with your Normal map first, create your Alpha channel, and copy the “green” channel into it. Copy and paste your “red” channel into your “green”, and place the Gloss map into the “blue” channel. Insert your grayscaled Diffuse into the “red channel” last, that way it will overlap the rest of the layers, creating a better appearance. You should set it to lower resolution (256x256 or 512x512) than rest of your texture maps, to avoid memory overload. Save it with a “CryTifPlugin” with an end suffix “_detail”, and when the RC emerges, save it with a preset “MergedDetailMap”. Select your resolution (to let your know, for all of the texture maps, I selected “-2”.
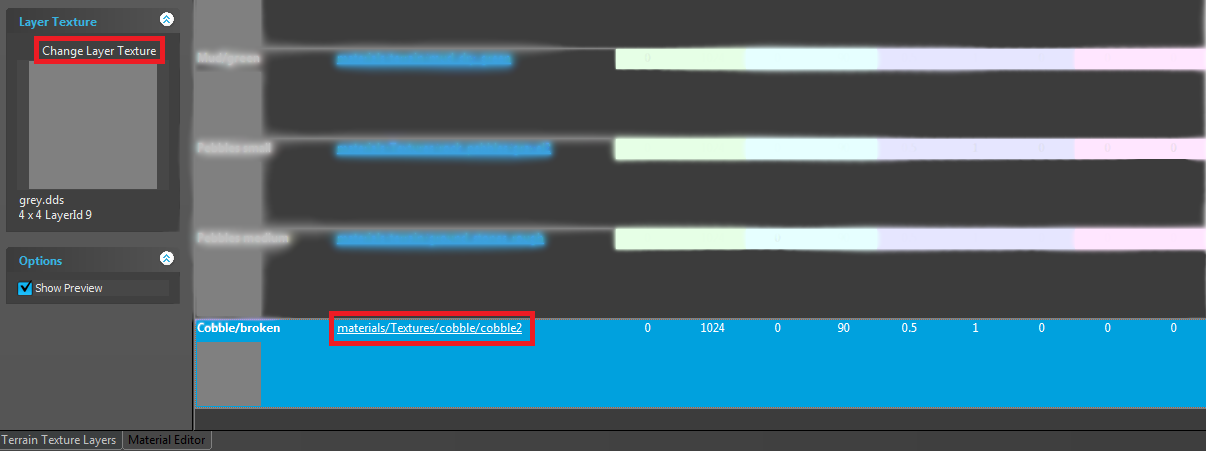
As we move on, you can see in your “Texture” folder that you produced five different texture maps, and you should have “.dds” copies. In CryENGINE SDK, open up your empty level, and go to your “Texture” tab. Create a new layer or use the existing default, add your “Layer Texture”. I usually select “gray.dds”, however there are probably much better choices. I provided a photo below:
Go to the Material Editor within the “Texture” dialog, and open up your material. Now remember this is where your Material folder (.mtl) comes in. Create a new “.mtl” file, and name it (preferably the same as your texture name).
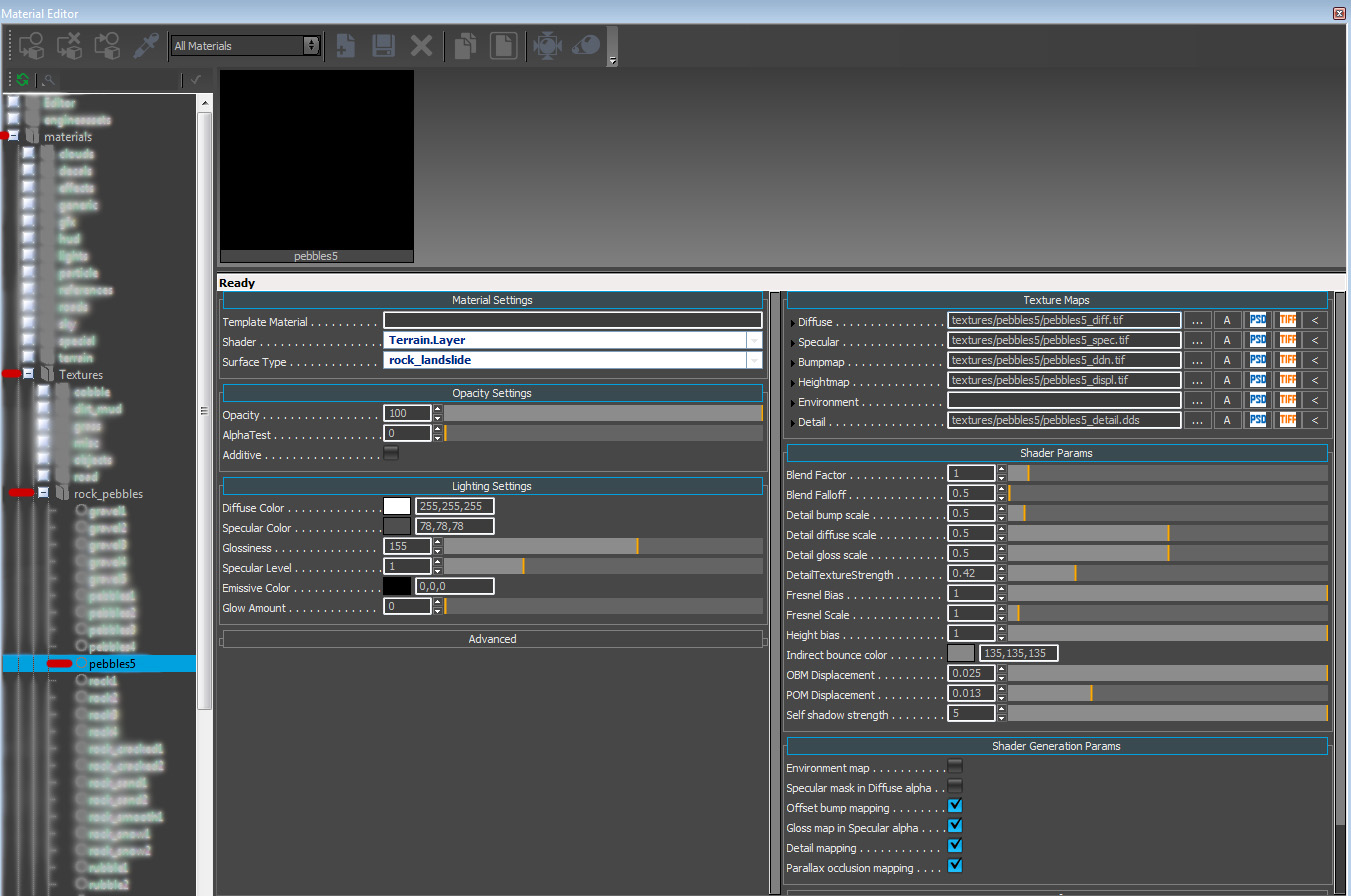
By using my “pebble5”, being as a wet texture and having a “Gloss map” you should have something like this:
Next, select your “.mtl” file, go back to the “Texture” tab, and click on “assign material”. Last things you do is just go to your “terrain” tab in the “Rollup Bar”, hit “layer painter”, select your color, and click “flood”. You are done!
One more thing to remember, people CryENGINE business (addressing beginners), please do not let this fly over your head, with a few steps you will be as good as anyone. Time is everything, do not expect to learn this in one day, a week, or perhaps what you might think ages. I was totally flabbergasted by this at first, and I did not know how to even create a simple Diffuse Map or even setup texture + material folders. With time I learned and got familiar with it. Like I said before, if you have any questions, please ask me.
I hope you liked this or found something useful in this blog of mine, thanks for reading and see you next time. Please share if you like!
Firstly, to produce terrain textures, is to create two subfolders in your GameSDK folder, “Materials” and “Textures”. “Materials” folder is where you should store your Material Editor files (.mtl). Whereas the “Textures” folder, stores your actual library of your texture maps (Diffuse, Specular etc.), and you should have separate folders for your different textures.
Also, name your subfolders the same name your texture files are, to avoid confusion. Even though some people have different ideas of organizing, this is at least mine. I tried many other ways other than this, but it either crashed or a “Resource Compiler” error.
Next, find an image that you are convinced that will fit inside your scene/level, and download it from the internet. I use CG Textures, there are others, including: maxTextures, TextureX etc.
The joy in texturing terrain is that there is no huge magic behind this, just Photoshop + Crytif Plugin and Crazybump, some people have different techniques. However, developers from CryTek use the same approach. Differences between Nvdia and Cb are below:
Also the Offset Bump Mapping vs Parallax Occlusion Mapping (OBM shows up in low settings and POM appears in higher settings:
My routine is creating Diffuse, Specular, Unified Detail, Gloss maps etc., in Photoshop. Then I use Crazybump for Normal and Displacement maps. You need the CrytifPlugin for Photoshop from Crydev to make these operable in the Engine. If you cannot get your textures working right, it is probably because you do not have Photoshop and the Crytif Plugin from Cry Dev. Also the “Material Editor” in the CryENGINE SDK is to organize your textures, and fine tuning.
The creation of Diffuse, Specular, Normal, Displacement, perhaps Gloss and Unified Detail maps take endurance and experimentation to get right (especially when I have 110+ stash of textures). Many of my textures are 512x512s, but I am beefing up my arsenal quickly with 1024x1024 and 2048x2048s.
You have to make sure you textures are seamless! Open your Diffuse in Photoshop, offset the texture with “Filter\Other\Offset…”, and make sure it “wraps around”. After that, use the “Close Stamp Tool” (hotkey: S), this takes time and much practice, but it is worth it. Just remove those seams by cloning and stamping.
Here is the original image from CG Textures below, which I will display all along this blog. Fortunately for you, I converted it to seamless, you can download the original JPEG Diffuse (1024x1024) right below.
http://u.cubeupload.com/Roughbeak/1diffuse.jpg
Each texture has its own different settings and tweaks, and I will try my best to explain them to you.
Diffuse (_diff)
The most common type of texture, and it defines the main color. It is totally flat, like a photograph being painted on the surface.
First, open up your texture you downloaded in Photoshop. Depends on what resolution you want your texture in or what the image was originally, never stretch the image more than what it was originally. Always set your texture to the power of 2 (e.g. 512x512, 1024x1024, and 2048x204), it is good practice to start with the common 512x512, because it is relatively small in size and memory. Now save it as “CryTifPlugin” with an end suffix to your name of the file to “_diff”, and in the Resource Compiler (RC) Dialog save it with a preset either as a Diffuse (either “HighQ” or “LowQ”
or “TerrainDiffuse” (I have had much more success with the latter). The “_diff” is to notify the Resource Compiler that the texture is a Diffuse. Also tick the “bilinear” option, which is a method to smooth textures when displayed larger or smaller than they are. Next, choose your higher or lower resolution inside the RC (which makes the texture clearer than it actually is). Lastly, save it. Specular (_spec)
Purely black and white image that represents the intensity of the “shininess” or “light shine” on the surface.
To produce this texture map, you need to use your same “diffuse” as the basis and click “adjustments\black and white” in Photoshop. Next, you need to go to “adjustments” tab again, and click on “levels”. If your texture is a rock surface (including cobble), I would recommend a “62”. For other materials, like grass or gravel, perhaps, a little less. However, you can play around with these to your liking, higher levels determine how the shininess will it appear and so on. Go ahead by saving this as a “CryTifPlugin”, now with a “_spec” end suffix and click save. The RC will arrive once again and select “SpecularHighQ” (or LowQ), then lastly choose your resolution (inside the RC).
Gloss
This is only if needed, but is basically the Specular’s cousin. It is an Alpha Channel specific inside the Specular map. The difference between this and Specular, is that “Gloss” controls the spread or width of the specular intensity. The more white it has, it will be smoother or glossier (wet) in the Engine. Whereas if you have a darker Gloss map, it will be more rough or spread out.
To create this, you need to start out with your original Diffuse, de-saturate it in Photoshop, adjust some values with “adjustments”, and throw on some dodge/burn if needed. The reason I am keeping this vague, is that there is no “one way” of achieving this, you just have to imagine what your material is, dry, wet etc. Again, keep in mind that you are controlling the highlight spread, not the intensity. When you are ready, select all of the image (Ctrl + A), and paste (Ctrl + V) into the Specular’s Alpha Channel. Save your Specular map, again, with the “CryTifPlugin”, and an end suffix “_spec”. When the Resource Compiler appears, select “Alpha” instead of RGB, and the preset as “SpecularWithGlossInAlpha_HighQ”. Lastly, choose your resolution. In the Material Editor, make sure you tick the “Gloss map in Specular alpha”.
Normal Map (_ddn)
The next two texture maps (Normal and Displacement) is what makes texturing quite an enjoyment. The Normal map, is the successor to the famous “Bump Map”. They have small differences between them, but among many CryENGINE artists, they use these two words interchangeably. This specific texture map appears to add depth to your material, and it produces details to the surface (usually shadows) without raising the number of polygons.
To generate this colorful map, we need to have the Nvdia Normal Map Plugin for Photoshop (making sure it is correctly installed) or the nice program named Crazybump (I suggest the latter). Using your default Diffuse as the base, we begin. I recommend using the default settings when you click on your “Normals” tab in the software. I tried without the default settings, but they turned out horrible in the Engine. Save it within Crazybump, and open your newly saved Normal with Photoshop. Go ahead and save it with an end suffix “_ddn” and as a “CrytifPlugin”. Again, the RC will show up, and save it as a “Normalmap_lowQ”. Saving it as a “Normalmap_HighQ” will cause problems, however. Then lastly, choose your resolution within the RC.
Displacement Map (_displ)
The Displacement map works in a similar fashion to “height maps”, but uses smaller functions. As the name describes, this map “displaces” the underlying surface mesh. Also, this activates things in the CryENGINE SDK’s “Material Editor” such as Parallax Occlusion Mapping and Offset Bump Mapping. This texture map is generally not used on its own, but instead used for larger details, and Bump or Normal Maps then can handle the smaller shadow details.
To create the Displacement map, we have two different routes, either with hand painting it in Photoshop (time consuming) or in Crazybump. However, some artists like hand painting to give great detail to rock textures, but I found out it is impossible to achieve this with a grass or perhaps a gravel texture. It was a great day when I found Crazybump, this neat software does this for you. We begin by opening Crazybump, select your same Diffuse and wait for it to load. By using my “pebble5” as an example:
I moved the Depth to “60” and Enhance Detail to “10”. That should be good enough, go ahead and save it as a “JPEG” in your CryENGINE texture library within Crazybump. Now go to that same folder you store them, and open up your JPEG with Photoshop. Being as a “Displacement” it is a bit different from the rest of the texture maps, so we go ahead by clicking “ctrl+a” (which selects all of the image), and place it in its Alpha channel. Save it as a “CrytifPlugin”, with a “_displ” end suffix. When the Resource Compiler shows up, instead of the “RGB” option, select “Alpha” instead. Save it with a preset as “DisplacementMap”, and lastly choose your resolution. After that, it would be a good idea to delete that original JPEG image that you stored in the library.
Unified Detail (_detail)
Also this is used when necessary (usually with rock surface), this texture map gives the texture macro detail over the surface at moderately low cost, memory and performance wise. However, this texture map is a bit complicated than it appears. Being a unified method, it has to be constructed similar to this:
Starting with your Normal map first, create your Alpha channel, and copy the “green” channel into it. Copy and paste your “red” channel into your “green”, and place the Gloss map into the “blue” channel. Insert your grayscaled Diffuse into the “red channel” last, that way it will overlap the rest of the layers, creating a better appearance. You should set it to lower resolution (256x256 or 512x512) than rest of your texture maps, to avoid memory overload. Save it with a “CryTifPlugin” with an end suffix “_detail”, and when the RC emerges, save it with a preset “MergedDetailMap”. Select your resolution (to let your know, for all of the texture maps, I selected “-2”
. As we move on, you can see in your “Texture” folder that you produced five different texture maps, and you should have “.dds” copies. In CryENGINE SDK, open up your empty level, and go to your “Texture” tab. Create a new layer or use the existing default, add your “Layer Texture”. I usually select “gray.dds”, however there are probably much better choices. I provided a photo below:
Go to the Material Editor within the “Texture” dialog, and open up your material. Now remember this is where your Material folder (.mtl) comes in. Create a new “.mtl” file, and name it (preferably the same as your texture name).
By using my “pebble5”, being as a wet texture and having a “Gloss map” you should have something like this:
Next, select your “.mtl” file, go back to the “Texture” tab, and click on “assign material”. Last things you do is just go to your “terrain” tab in the “Rollup Bar”, hit “layer painter”, select your color, and click “flood”. You are done!
One more thing to remember, people CryENGINE business (addressing beginners), please do not let this fly over your head, with a few steps you will be as good as anyone. Time is everything, do not expect to learn this in one day, a week, or perhaps what you might think ages. I was totally flabbergasted by this at first, and I did not know how to even create a simple Diffuse Map or even setup texture + material folders. With time I learned and got familiar with it. Like I said before, if you have any questions, please ask me.
I hope you liked this or found something useful in this blog of mine, thanks for reading and see you next time. Please share if you like!
Last edited: